Windows has come up an important aspect called Telemetry which helps users to send the meaningful data when they decide to upgrade the version of their operating system. Microsoft is one platform that does all the planning, building and delivering all the advanced features to the operating system of windows 10. If you are here then you might be facing microsoft compatibility telemetry high disk issue on your PC/laptop.
The Microsoft compatibility telemetry service amongst them that does all the planning and building of data. It is one of the exciting features which automatically gets enabled in the Microsoft device and helps in collecting data of the user’s activity and then circulate the gathered data to Microsoft.
The whole idea of telemetry feature is quite simple yet many times it causes trouble to the users because of its high disk usage that degrades the functioning of the system and it also threatens privacy.
Despite such limitations, telemetry is one tool where users can easily get the information about the performance, mods, specifications etc. because it causes a lot of turbulence in the work of the users and they are forced to disable the Microsoft compatibility telemetry or compattelrunner.exe. So this article is specifically written to make you learn about how you can disable the Microsoft compatibility telemetry process.
Table of Contents
What is Microsoft Compatibility Telemetry?
The basic purpose of Microsoft Compatibility Telemetry is to process all the technical data that allows you to examine the performance of the computer and it also takes control of the information present in the device and the software.
The major work that Microsoft does is to collect all the information from the device, combines the data and then uses the collected data to bring the improved and better services that enhance the work experience of the users and at the same, it keeps the safety of windows.
The major functions of Microsoft Compatibility Telemetry that includes –
- It functions in the matter of safety and secure windows.
- It enhances the windows performance.
- It keeps data reliable.
- It keeps your windows advanced and updated.
- It allows you to customize or personalize surfaces.
- It examines the usage of windows and gives improved end results.
This is to inform that you should not confuse Microsoft Compatibility telemetry with Data functioning and for that, I will now give you a brief idea about the telemetry data. Microsoft compatibility Telemetry provides information about the usage of data, hardware details, information about the installed application and also the reliable information on device drives.
How to Fix Microsoft Compatibility Telemetry?
This telemetry tool consumes a lot of disk processing resources and that results in high usage of CPU. Not only consumption of space but also telemetry transfers all the information to the Windows.
With the help of these methods which are mentioned below will help you to fix microsoft compatibility telemetry high disk on your device. So the methods are as follows.
Note: If you disable Microsoft Compatibility Telemetry in Windows 10 then you won’t be able to participate in windows insider program. Windows insider program uses telemetry to know about the bugs and user experience in preview builds.]
Also check: How to disable Antimalware Service Executable
How to Disable Microsoft Compatibility Telemetry?
Method 1: Using Command Prompt
You can easily fix microsoft compatibility telemetry high disk on your PC by using the command prompt method. This method is quite easy and gives reliable results. The complete process is mentioned below in a step by step.
- First, you need to search for the command prompt in windows search.
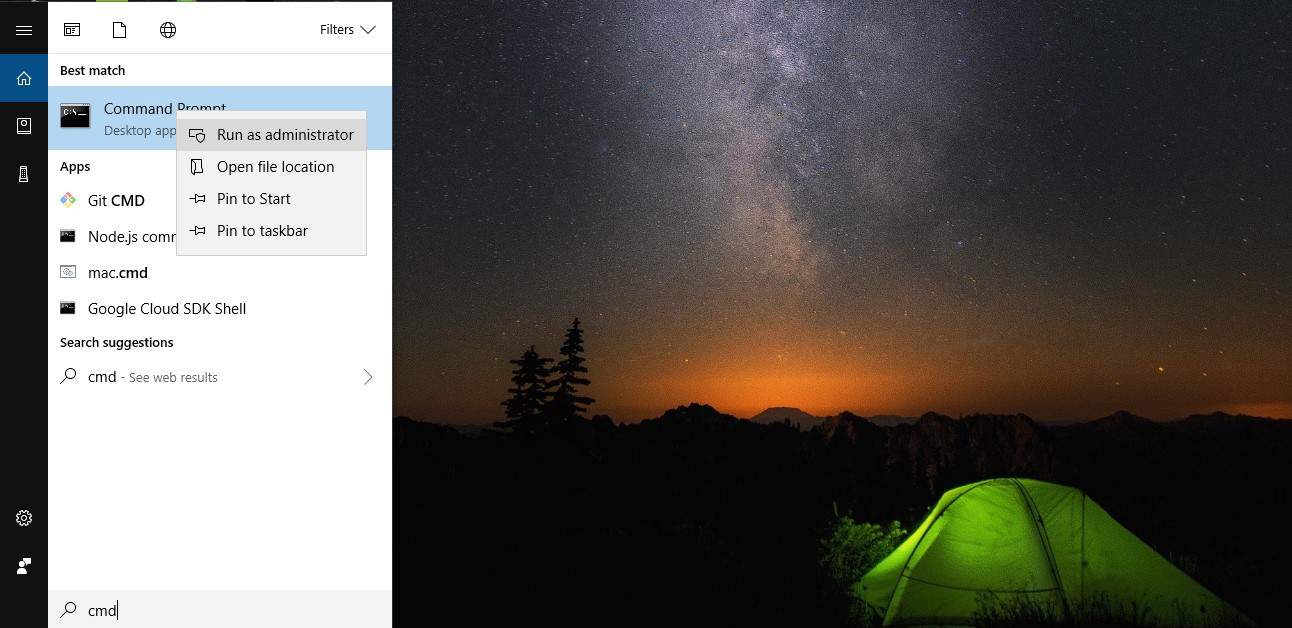
- Then, you need to open the command prompt as Admin. To do that you need to search for cmd and right click on it to select “Run as administrator“.
- Then after that, you need to copy-paste the following commands on the command prompt window and hit the Enter.
c delete DiagTrack
sc delete dmwappushservice
echo "" > C:\ProgramData\Microsoft\Diagnosis\ETLLogs\AutoLogger\AutoLogger-DiagTrack-Listener.etl
red add "HKLM\SOFTWARE\Policies\\Microsoft\Windows\DataCollection"/v AllowTelemtery/t REG_DWORD/d 0 /f
Method 2: By Using Registry Editor
This is the second method in the line which will help you fix microsoft compatibility telemetry high disk by using the Registry editor method which is highly reliable. Just follow below steps to disable it easily.
- The first step in the process is to open your Registry editor window and you must be wondering how will you reach the registry editor then you must not worry and you just have followed the steps.
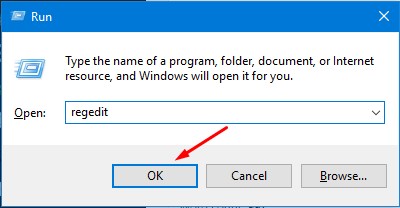
- Just press Windows+R and type “regedit” in the Run window which will take you to the Registry editor window.
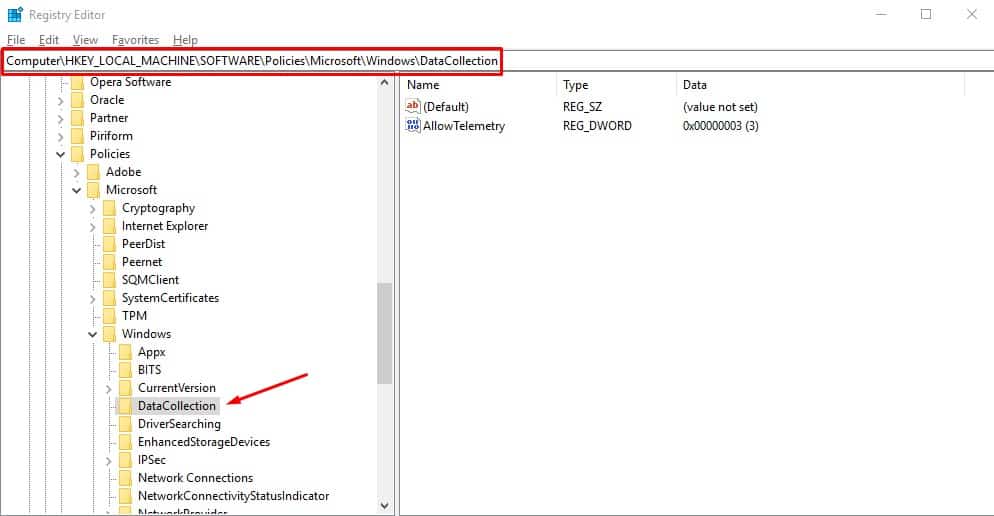
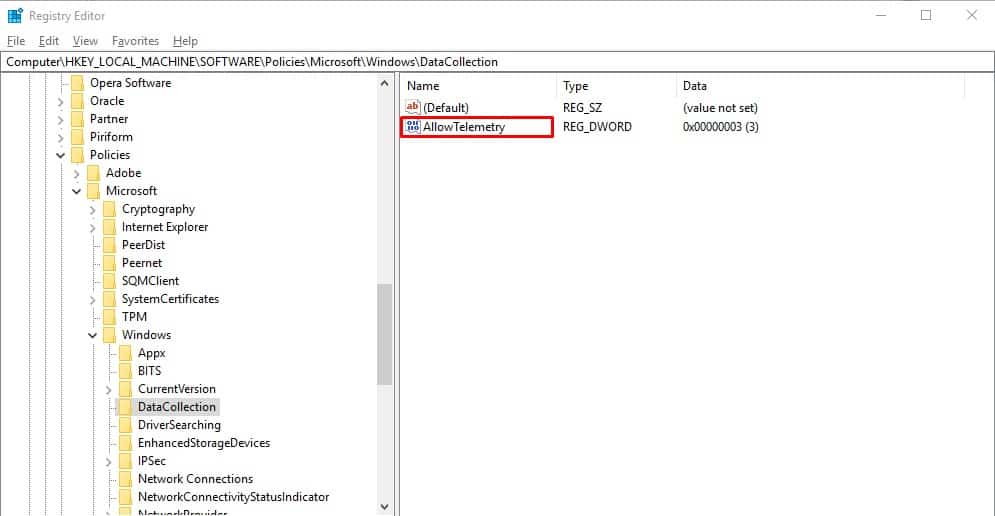
- Once you are in registry editor window, navigate to HKEY_LOCAL_MACHINE > SOFTWARE > Policies > Microsoft > Windows > Data Collection or just copy-paste “Computer\HKEY_LOCAL_MACHINE\SOFTWARE\Policies\Microsoft\Windows\DataCollection” in the top bar as shown below.
- In Data collection option, you may find a key named “Allow Telemetry“. If you don’t find that key then move to next step.
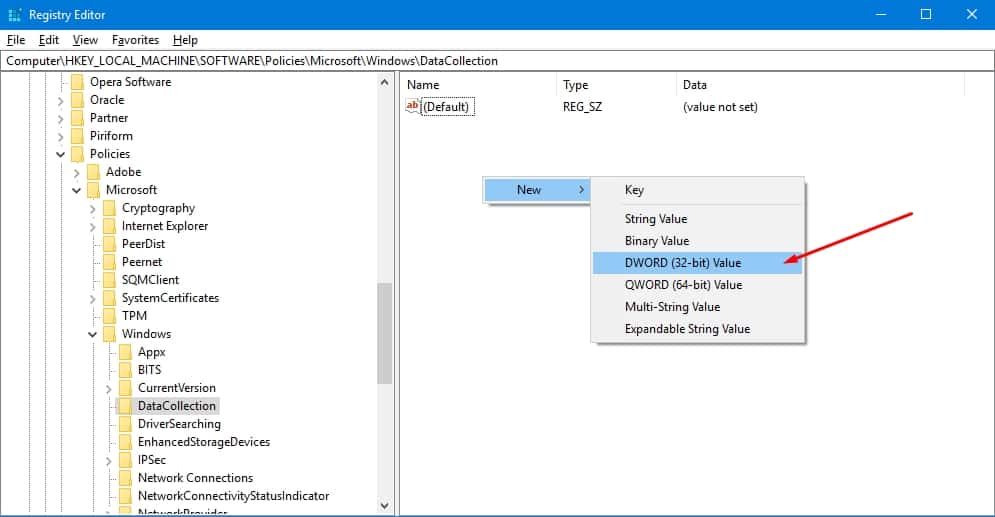
- If you don’t have Allow telemetry key then you need to create one. To create, you need right-click on empty space as shown below and select New > DWORD (32-bit) value.
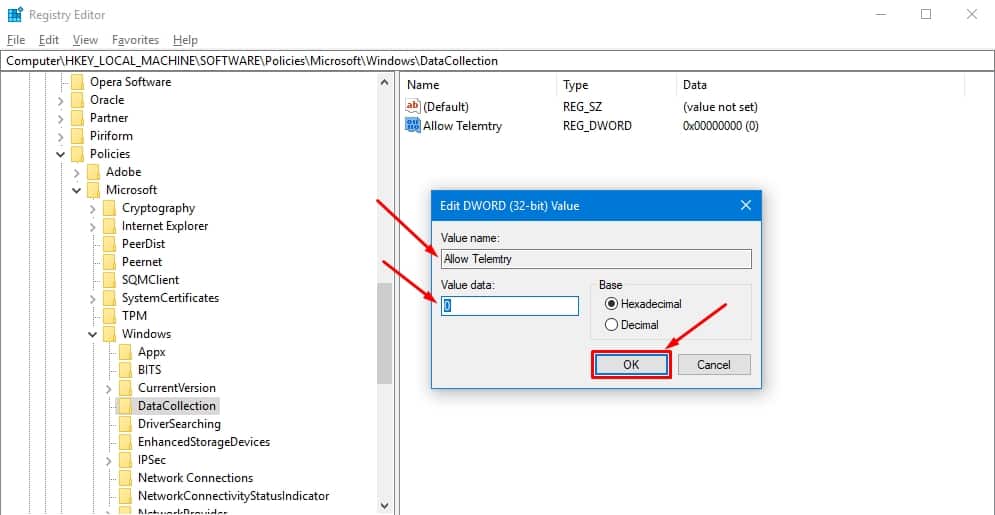
- Next, rename that to Allow Telemetry and double-click on it. Now assign 0 to the value data as shown below.
- Now, open Task Manager by pressing Ctrl + Alt + Esc and check whether Microsoft Compatibility Telemetry is taking fewer resources.
Method 3: Using Local Group Edit Policy Editor
This is the easiest way to disable the Microsoft compatibility telemetry. Just follow these simple steps to do that.
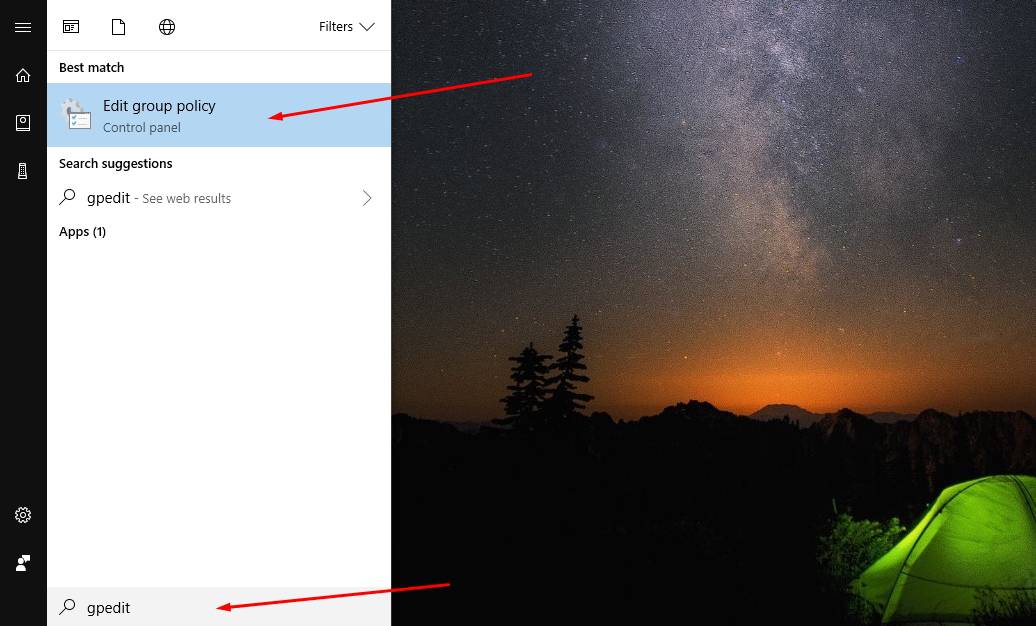
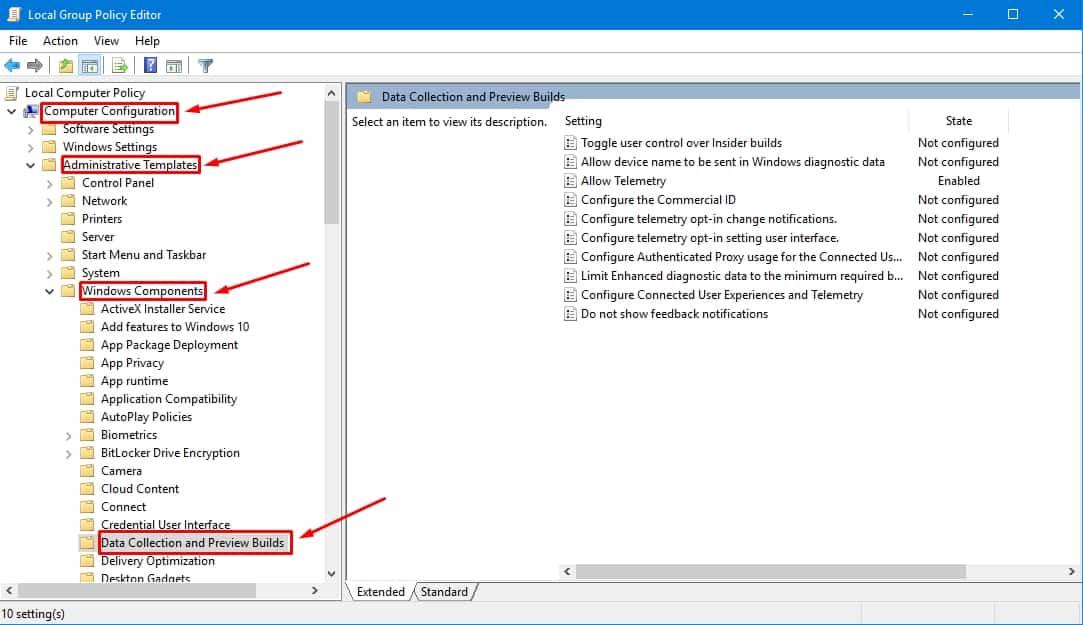
- Open Local Group Edit Policy Editor by searching by entering gpedit in search or type gpedit in Windows Run tool (Win+R) and hit Enter.
- Once you are in the editor, navigate to Computer Configuration > Administrative Templates> Windows Components > Data Collection and Preview Builds as shown below.
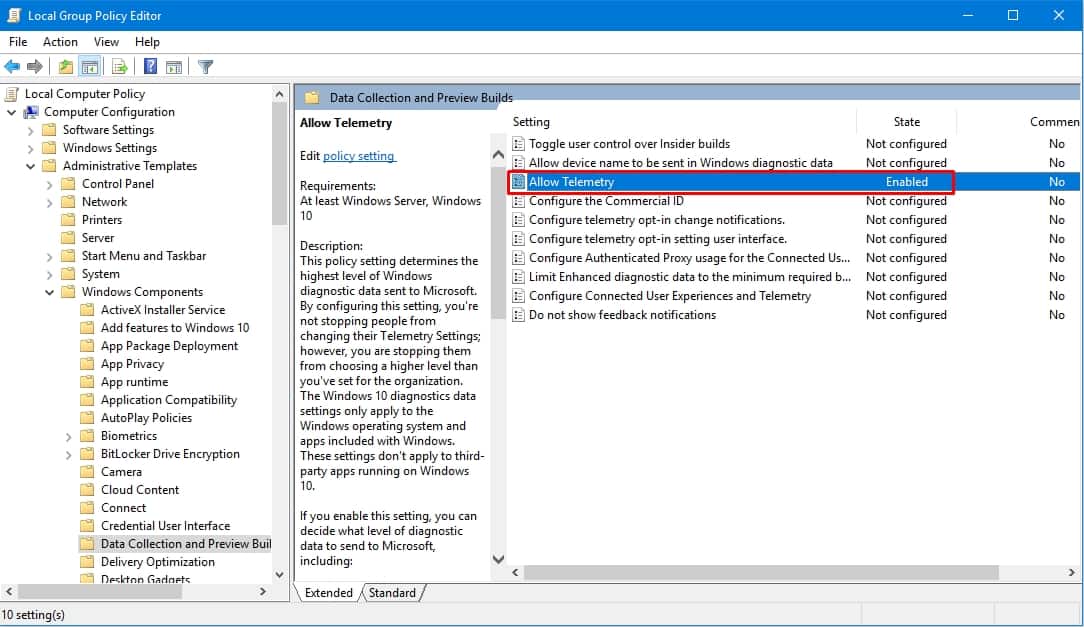
- Next, you will see an entry called Allow Telemetry on the right side of the editor. Double-click on it to open its options.
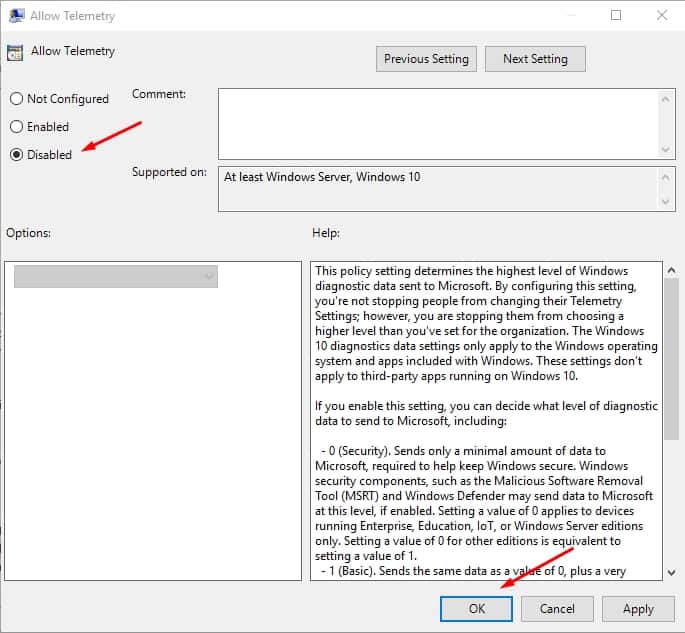
- You will be now on Allow Telemetry window, where you need to select the disabled radio button and click Ok.
Method 4: Through Task Scheduler
You can even disable Microsoft compatibility Telemetry using task scheduler. Just follow the below steps to disable.
- First, search for Task scheduler in windows search to open it.
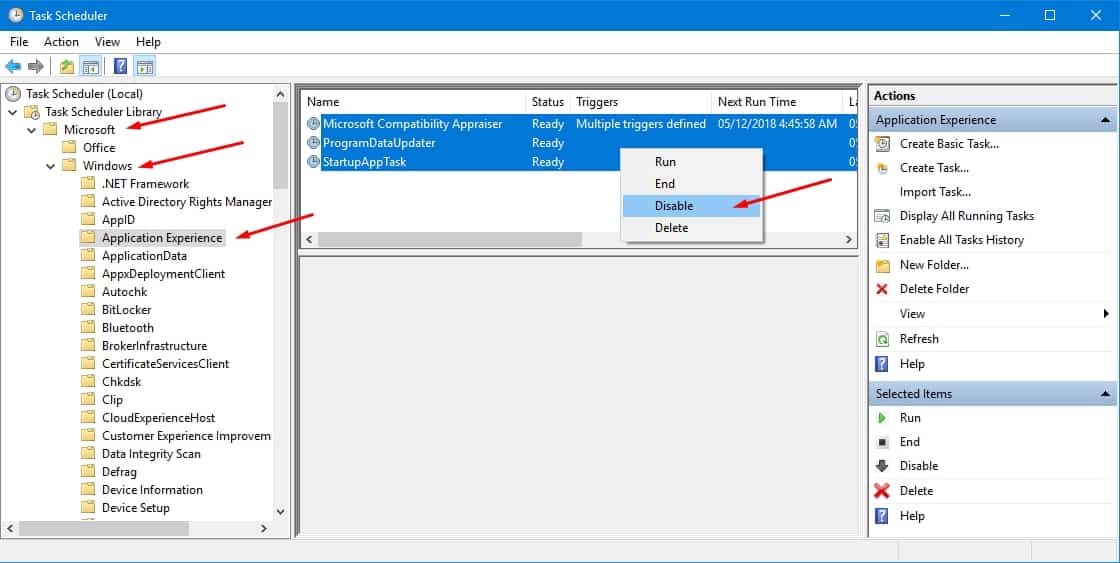
- Once you are in the Task Scheduler, navigate to Microsoft > Windows > Application Experience.
- In Application Experience, you will find 3 options. Just select all those three entries and right-click to disable them.
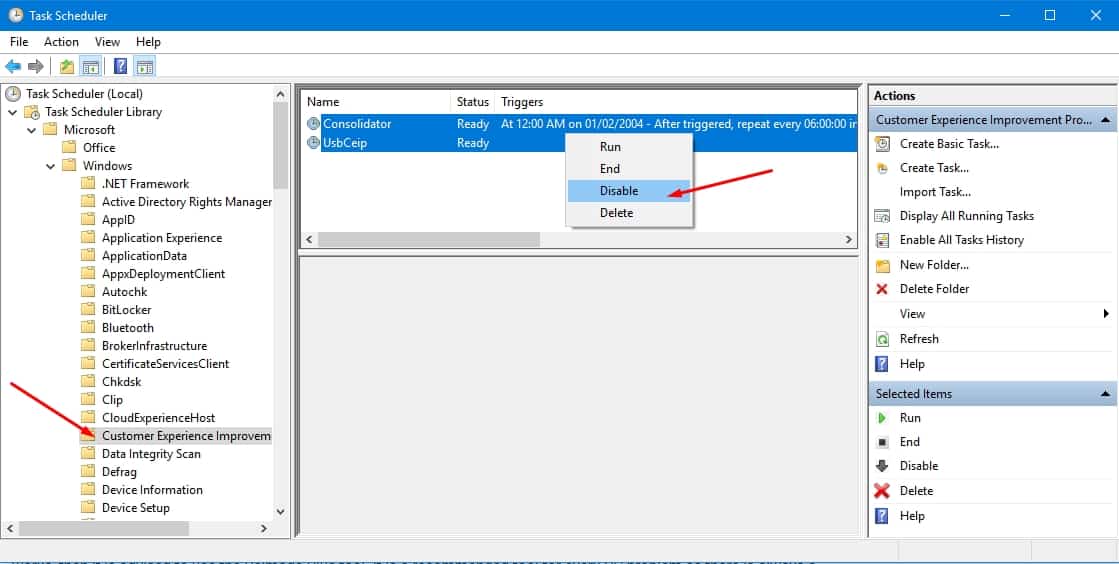
- Now, navigate to Microsoft > Windows> Customer Experience Improvement Program and disable all the entries in it.
- Now, restart your PC for changes to occur. You have now successfully disabled.
Method 5: Through Diagnostics Tracking Service
As we know that windows compatibility telemetry helps to give an improved and better experience to the users and if you really want to disable it you can easily do it by disabling the option “automatic feedback”. You are requested to follow the steps that will help you to disable the Microsoft Compatibility telemetry.
- First, you need to open the services. Just search for Services as shown below.
- Once you are in Services, just look for Diagnostics Tracking Service.
- Once you found that, just double-click on it to open its options.
- Now make startup type as disabled as shown below.
- Now, restart your PC for changes to occur. You have now successfully disabled.
We listed all the possible ways to disable Microsoft compatibility Telemetry. If you still face any issues and unable to disable or make the process take fewer resources then comment down below. I will try my best to help you.

Thanks very much sir finally I disabled windows compatibility telemetry in my laptop ,
Hi Pranathi,
Glad it helped you 🙂