There are a number of ways that old photographs can get damaged. Poor storage or even just moving from one home to another can mar printed photos.
Now, since there is a good chance that you have just one copy of these old images, it can be distressing to discover any kind of blemish.
There is no need to worry, though, since you may just be able to fix the problem by yourself. Below, you can discover some tactics to restore these printed photographs. Best of all, you will only need a home computer to manage it!
Table of Contents
Restoring Old Photographs with Home Computer
Figure Out Your Method of Digitizing
First things first, you will have to determine how to turn the printed photos into digital copies. Now, there are two ways in which you can do this. You can use a digital or phone camera to capture the image and transfer it onto the computer. Or, you can use a scanner to directly scan and upload the image.
The method that you select will depend on a few things. To start with, is the image very old or delicate? If so, you can’t risk damaging it any further. Therefore, you can leave it as it is and snap an image of it from your camera. Of course, you should be aware that this can be a tricky thing to master and it may take you a few tries before you get the hang of it.
A scanner is a good choice when you want to digitize the pictures quickly and efficiently. All you have to do is to place the pictures on the scanning bed and activate the machine. This option works well when you want to scan several pictures together.
Using the Right Software
It is important to keep in mind that you will need to have a good photo editing software on your computer before you get started. Now, there are quite a few options to select from – although you will find that the paid ones are a lot better than those you can get for free.
In most instances, Adobe Photoshop is one of the better choices for you. It is affordable, easy enough to use, and offers up plenty of features to the average user. Therefore, you will find that it is your best option.
Fixing the Color
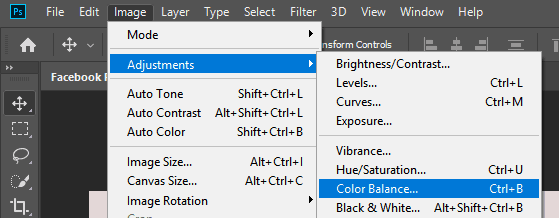
One of the biggest issues with older photographs is that colors can seem all wrong. Either they are faded or the colors don’t seem to match up. To fix this, you will need to access the following settings:
Select Image > Adjustment > Color Balance.
After this, you will have a choice between Shadows, Midtones, and Highlights. With most photos, you will find that Midtones allow you to create the effect you need. If you aren’t sure, though, trying out all options will help you to decide which to use.
If you wish to modify the colors of the photo, then select the Preserve Luminosity feature. Again, if this is not the result you want, you will simply need to deselect it. The next step is to move each of the Color Level options around until the image looks exactly like you want it to.
Tidying Up the Damage
Now, comes the complex part – getting rid of the signs of damage on the photograph. There are some beginner tools that you can rely on for this. However, you should keep in mind that the effects may be minimal. If the photo has been damaged rather badly, it is best to let a professional service such as https://www.instarestoration.com/ fix it up for you.
If you don’t mind trying it out for yourself, these are the tools to rely on: Spot Healing Brush, Patch Tool, and Clone Stamp. The Spot Healing Brush can be utilized to get rid of any dust marks on the image. If there are cracks in the photo, though, you will find that the Clone Stamp is of greater use.
If you want to clear up a smaller section of your photograph and make it look more professional, use the Patch Tool. It will match pixels, texture, and lighting of an undamaged area, allowing you to make the image look as close to perfect as possible.
These are the main strategies to keep in mind if you want to restore old photographs by yourself and on your own computer.


